Introduction
During this example, we will carry out all the steps required to get the current value of a parameter using the eagle.io API. This article is aimed a beginner who is not yet familiar with the eagle.io API. Those who are already comfortable using APIs and writing HTTP client code can probably jump directly into the API documentation.
Requirements
To access the API, all that is required is an API client and an API key.
In most real-life scenarios, the API client would be written in a programming or scripting language to achieve a specific task. However, for testing, demonstration and familiarization purposes, we highly recommend starting with the Postman client, which allows you to rapidly make API calls with no programming required. This example will use the Postman client. Even once you are at the stage of writing custom API client software, we still strongly suggest that you confirm everything works as expected in Postman first, before (and during) translating each API request to your own software.
Step 1: get Postman
Click the image below to get Postman:
Once you have downloaded and installed Postman, continue to the next step.
Step 2: get an API key
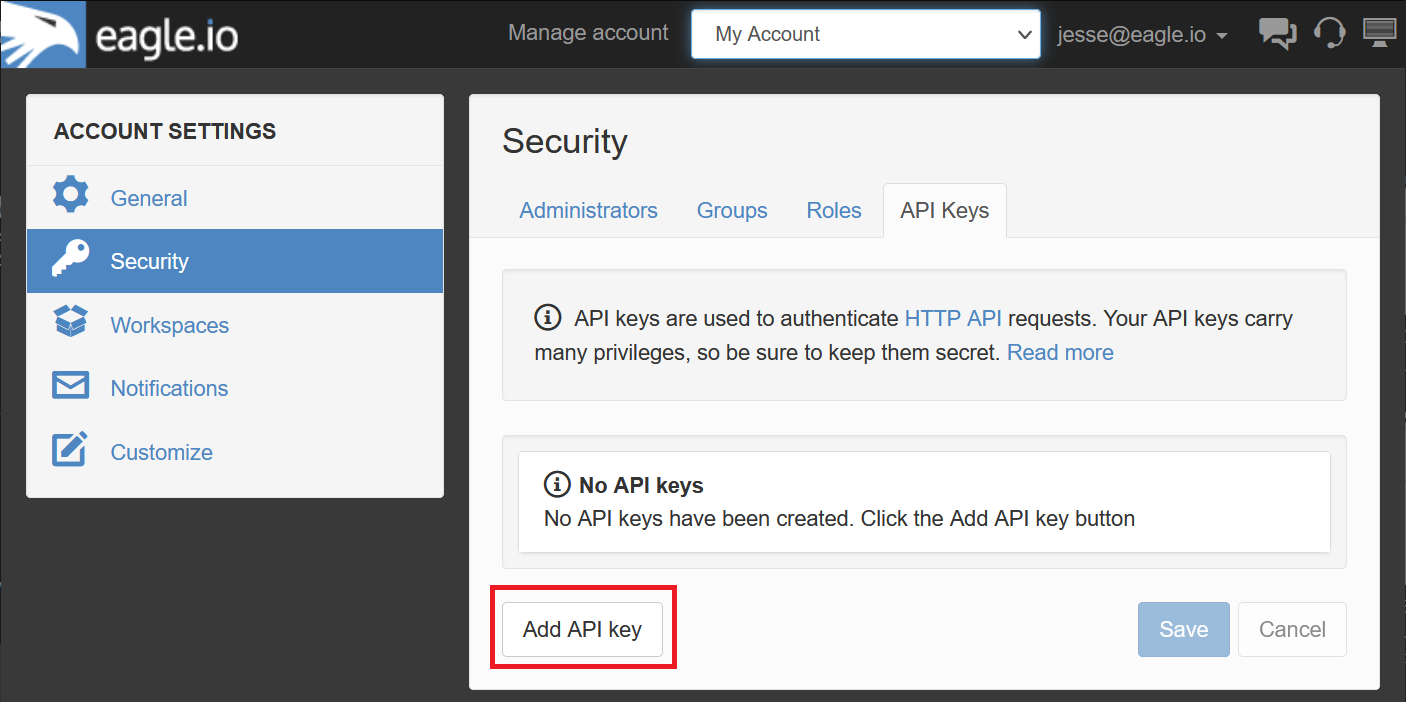
API keys can be created via your eagle.io Account Settings, in the Security section. If you have never create an API key before, you will see a message that says No API keys. Click the Add API key button to create one:
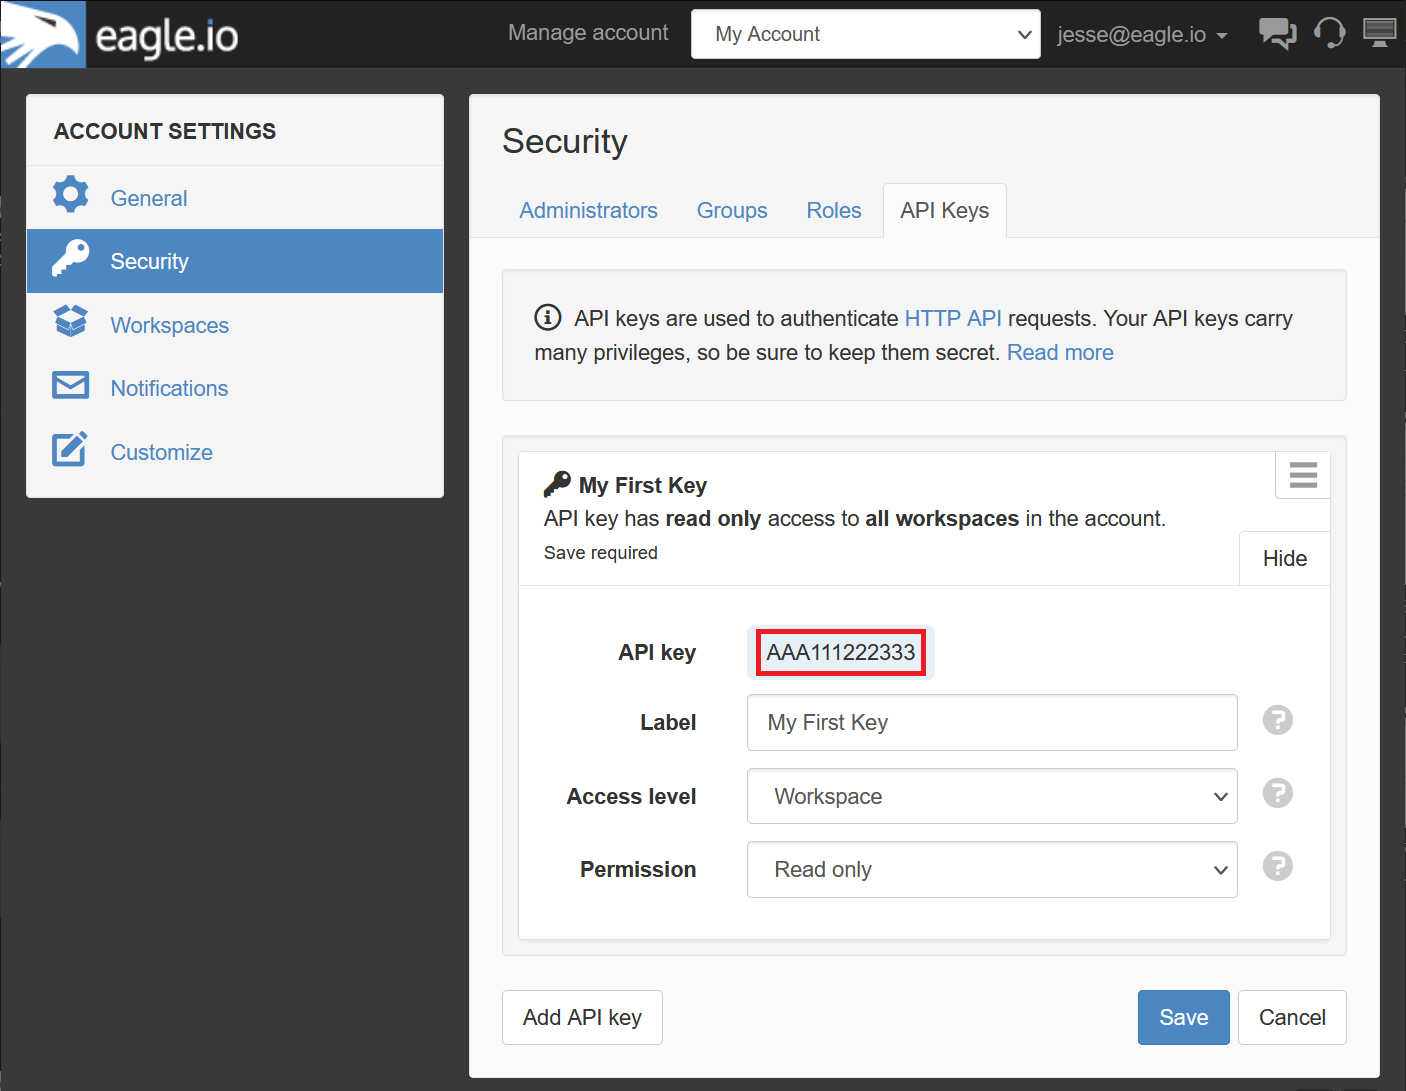
A key will be generated; throughout this example the key will be AAA111222333, although a real API key would be much longer and more random looking. You will need to enter a label for your key, which I have called My First Key. We will leave the access level as Workspace, meaning this key will have access to all workspaces in the account. We will leave the permission as Read only; this is good for testing because it means the key will not allow us to change any data via the API even if we make a mistake.
We will make a note of the API key (because we need it later) and then click Save:
Step 3: identify a node ID
Almost all API requests will involve one or more node IDs, so we need one for this example. Since we want to use the API to get the current value of a parameter, we need the node ID of the parameter. We can see this by looking at the parameter properties; the node ID will be in the bottom left:
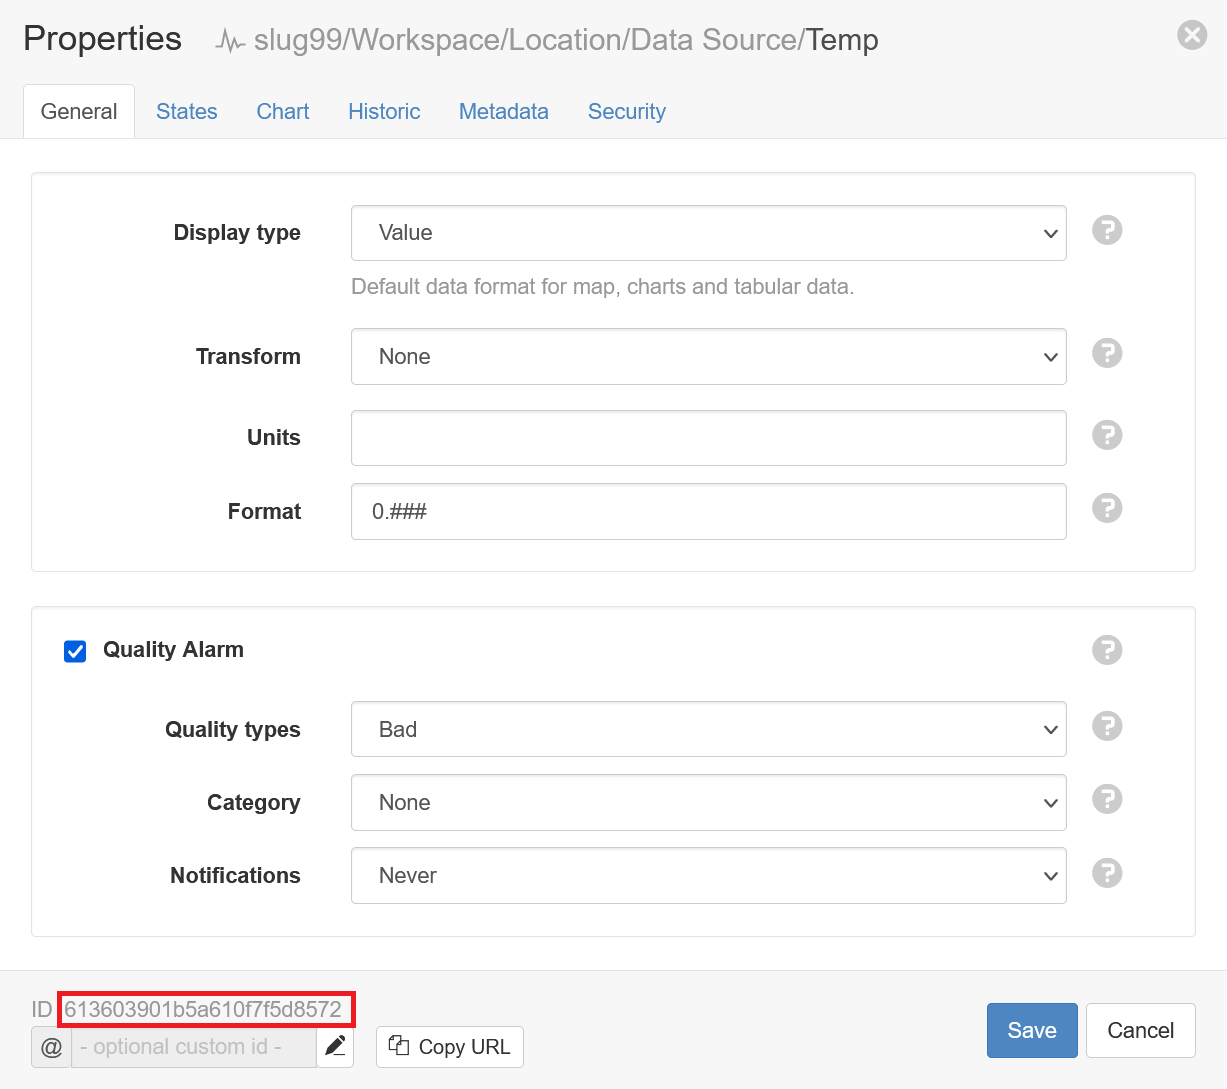
In this case, we see that the node ID is 613603901b5a610f7f5d8572
Step 4: create the API request with Postman
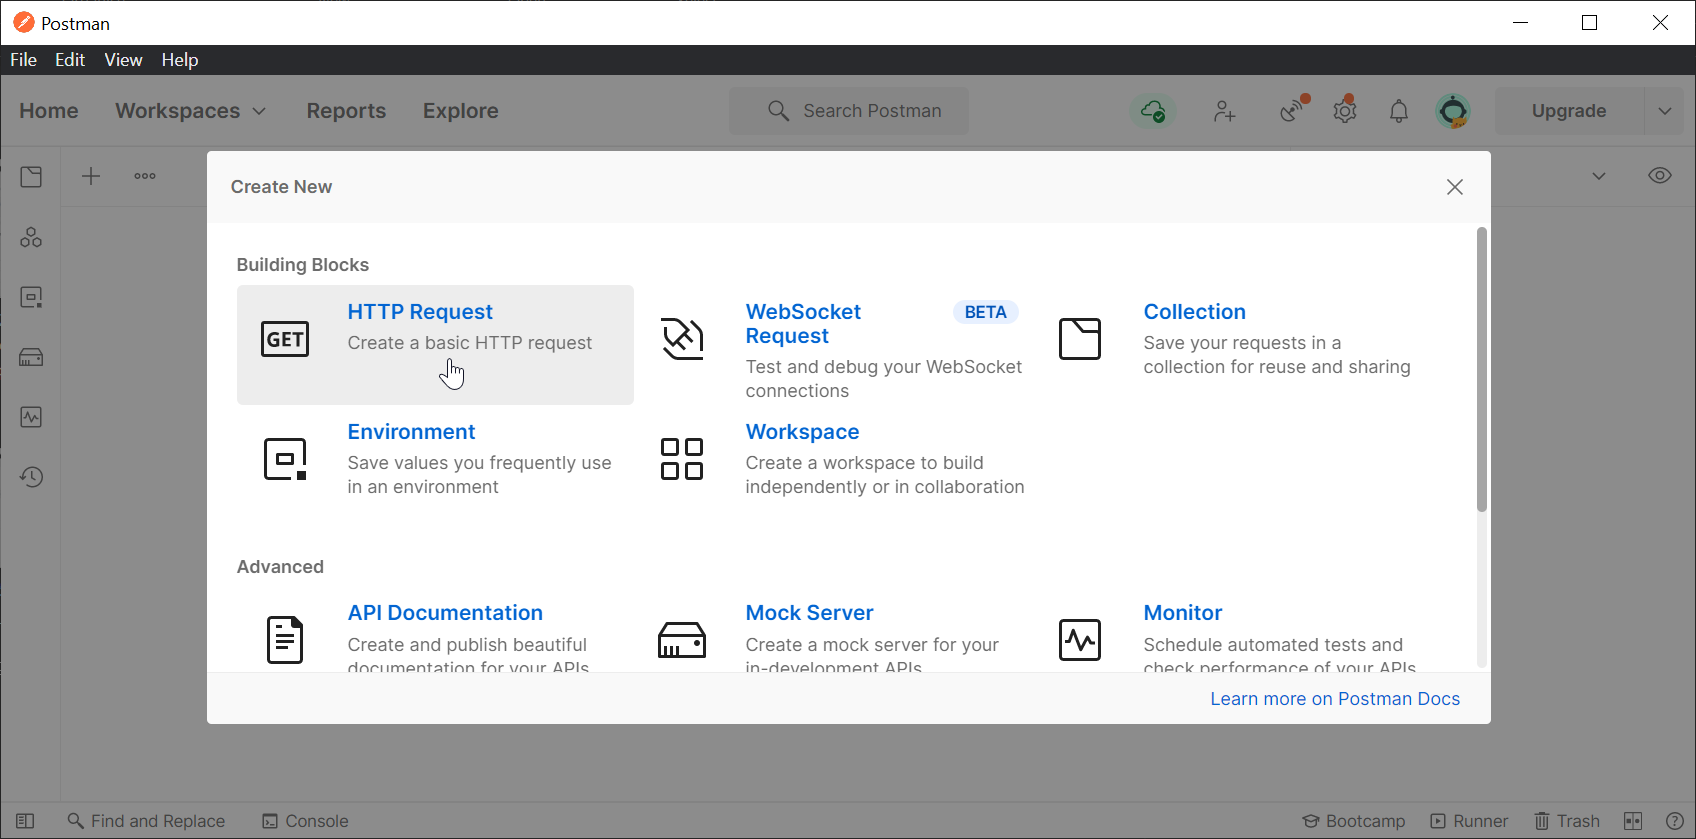
Now we have the required information (an API key and a node ID), we can start Postman. In the File menu, choose New... and create a new HTTP Request:
You should now see a new, untitled request like this:
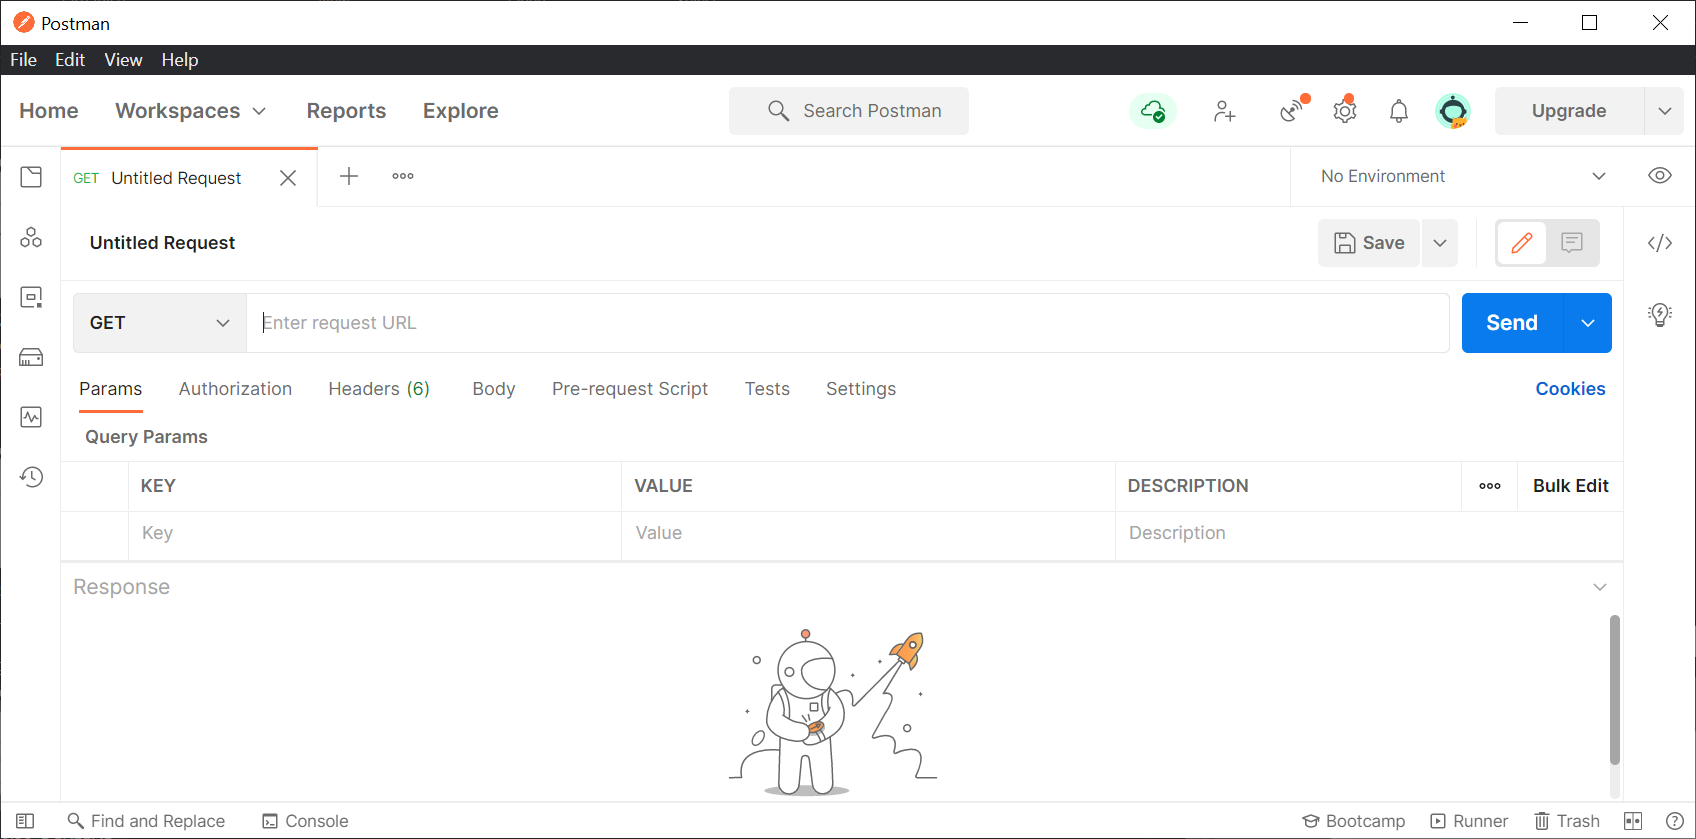
In the field labeled Enter request URL, we need to enter the correct URL to access the parameter node. The API request we will use is titled Retrieve a node in the documentation, and is described like this:
GET /api/v1/nodes/:id
This is a shorthand way for the documentation to tell us it will be a GET request, and how to construct the URL. Our untitled request in Postman is already a GET request, so we don't need to change that:

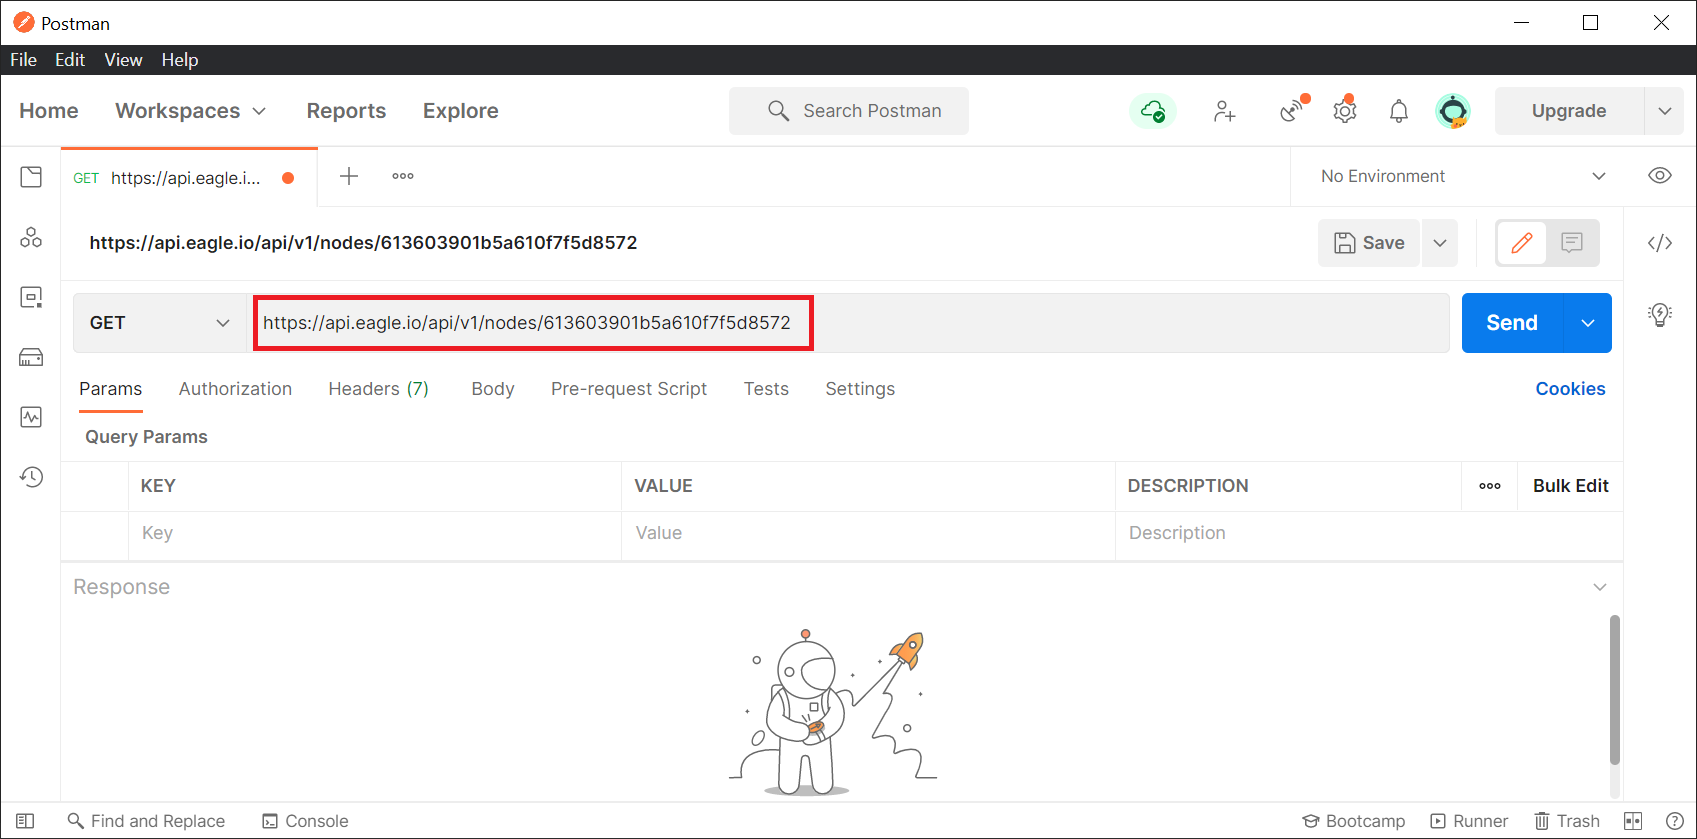
To construct the request URL, we always start with https://api.eagle.io/ and then add the specific request path from the documentation, which in this case is api/v1/nodes/:id However, the :id portion is shorthand for the real node ID of our parameter, so we need to substitute that. The full URL will therefore be:
https://api.eagle.io/api/v1/nodes/613603901b5a610f7f5d8572
So that's what we enter in Postman as the request URL:
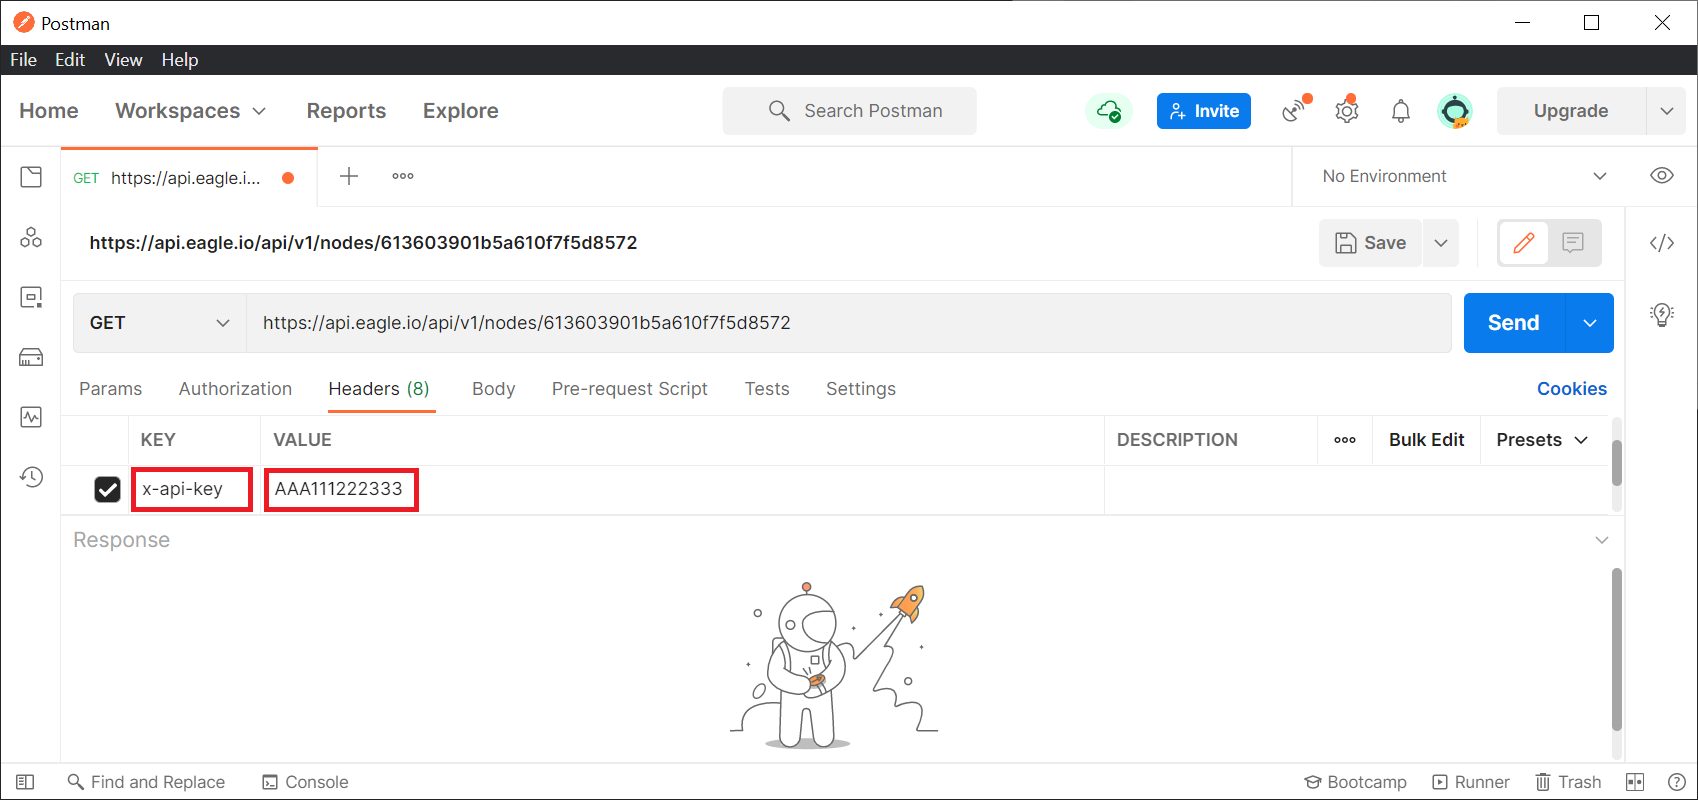
Next, we must enter the API key. This is done by clicking Headers, then entering a key of x-api-key and a value that matches your API key; in this example, it is AAA111222333:
Step 5: send the request
Now that we have the correct URL and the API key in place, it's time to send the request by clicking the Send button. Postman will then show the response from the request in the response window. The first thing to check is the status of the response, which should be 200 OK:

If there is a problem with the request, the status code will indicate the type of problem. For example, if the API key was incorrect, then the request would not be authorized, so the status would be 401 Unauthorized:
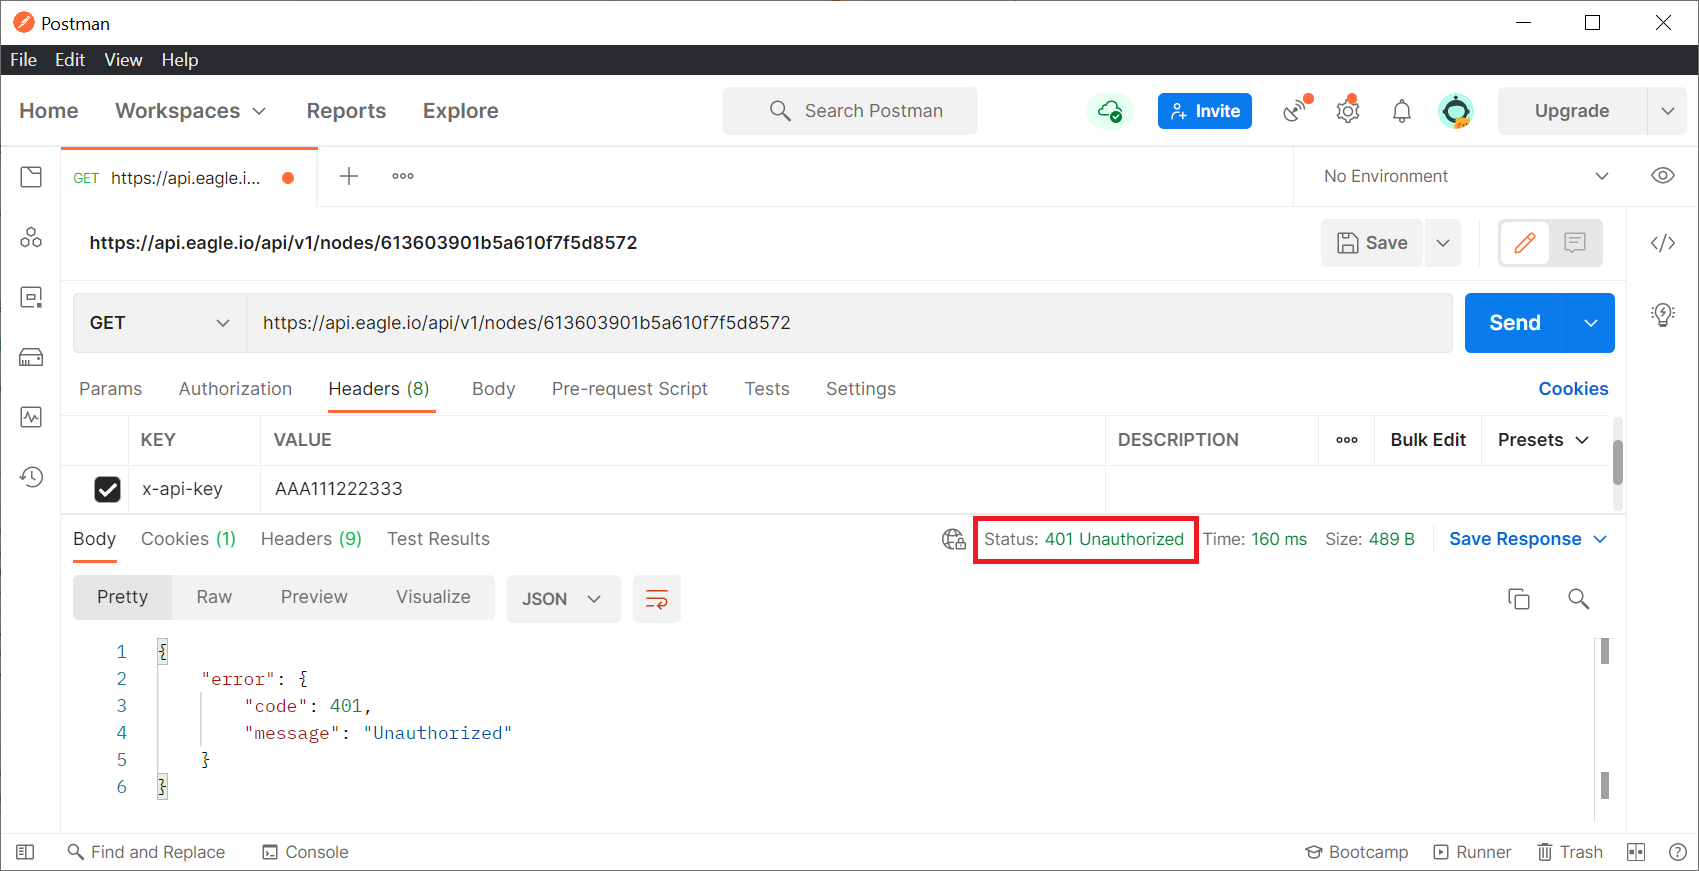
If you ever get the 401 Unauthorized status from your API request, check that the API key is correct and has access to the workspace which contains the node referenced in the URL.
Looking at the successful response again, we can see the body of the response is a JSON document containing the data model of a number parameter; this is the parameter that we referenced in the URL which has the ID of 613603901b5a610f7f5d8572:

The entire JSON document could be useful for other purposes, but in this case we just want to see the current value of the parameter. In order to limit the response to just the current value, we will need to add ?attr=currentValue to the URL, so that the full URL is now:
https://api.eagle.io/api/v1/nodes/613603901b5a610f7f5d8572?attr=currentValue
And then hit the Send button again. Now we see that the response body is still a JSON document but is limited to just showing the currentValue attribute:
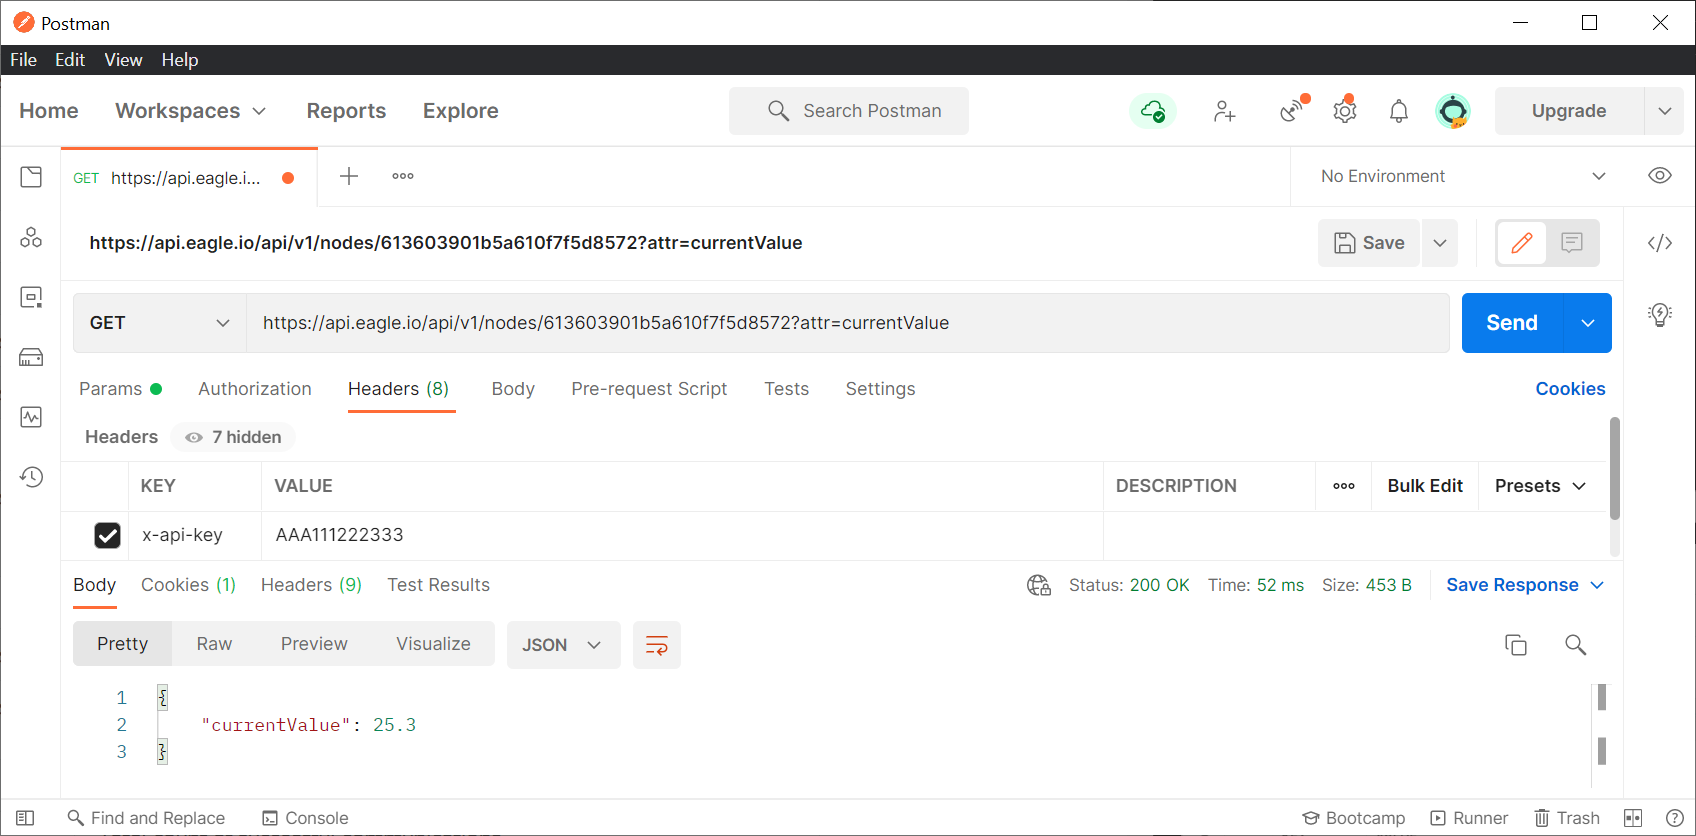
And this is the same value we would see if we look at the parameter in the eagle.io UI:

Step 6: convert this Postman example to code
Postman is extremely handy for testing and validating API requests, but ultimately these requests are generally intended to be performed by some kind of script or program which needs the results. Therefore, the request will need to be translated to code. While a coding tutorial is beyond the scope of this article, Postman does have the ability to translate requests to snippets of client code in various languages. To see this, click the </> button:

You can choose from a number of different languages; here we see what this specific requests would look like as a Python code snippet:
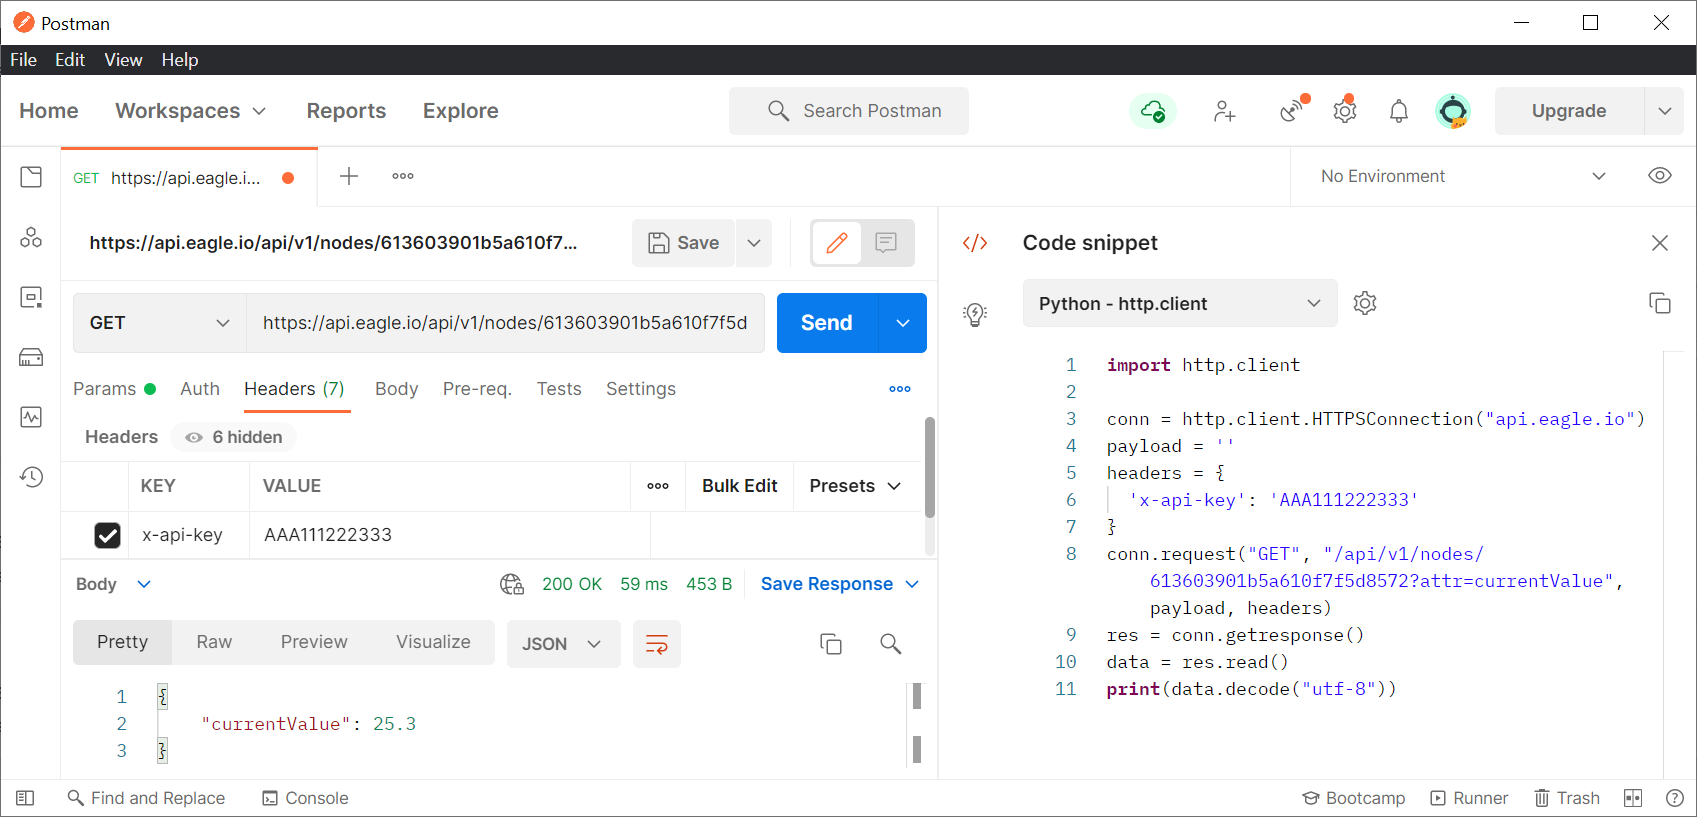
Any auto-generated code such as this should be regarded as only an example or starting point, and doesn't replace the need to have an understanding of the coding language in general and HTTP clients in particular. But it can provide welcome hints for both beginner and intermediate level programmers.
Summary
Postman is an incredibly useful tool, and when combined with reading and understanding the eagle.io API documentation, will set you on a path to success with your own API programs.

